 Howdy Crafters - I wanted to enter the Anything Goes - More than one Score - Scor-Pal challenge and needed a paper wallet to add to my grandsons Fishing Tackle Box click HERE to view the Fishing Tackle Box I created for his birthday.
 I did a search on the Internet on how to create a wallet using the Scor-Pal but could not locate one. However I found a great tutorial on creating an Origami wallet - therefore,. I created a tester wallet, then I figured out the Scor-Pal measurements to create another wallet in orange color - I included photos of the wallet and directions I used with the Scor-Pal to make my fisherman's wallet- see below - Thanks for stopping by and have a blessed week - Gail
Recipe -
Scor-Pal - my tutorial as listed below with Scor-Pal measurements
Kraft Cardstock
Patterned Paper - Fisherman - ATG and Glue to adhere patterned paper - if just making the wallet and not adding patterned paper - no glue needed
Lawn Fawn Happy Birthday Stamp from Hats off Set
Memento Black Ink
It would be an honor to share with
March Scor-Pal CH #35 More than one Score AG
March CHN Patterned Paper
winner for the March challenge and this is the result of using random.org: [posted on April 1, 2017 - thank you Hazel]
PDE #165 NO Cards #2
For the Origami Video that inspired me to do this wallet- CLICK HERE
Scor-Pal Wallet - 8 1/2 x 11 paper or cardstock and Scor-Pal
 |
| With the 11 inch side of the cardstock at the top of Scor-Pal score 1 1/4 inch- 2 3/4 inches - 5 1/2 inches and 8 1/4 inches |
 |
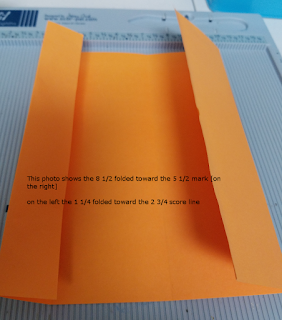
| Crease all score marks - then fold the 1 1/4 toward the 2 3/4 and Fold the 8 1/4 to the 5 1/2 as shown in this photo |
 |
| Fold the 1 1/4 again - flip the page over and lay the 8 1/2 side to the top of the Scor-Pal |
 |
| Fold a triangle on the longer piece and place inside as show in this photo |
 |
| Your wallet should now look like this |
 |
| You can either place the wallet on the Scor-Pal and score down the middle of the wallet or fold the right over to meet the left and crease the middle fold as show in this photo |
 |
| This is what the inside of the finished wallet looks like |
 |
| This photo shows the pocket that is in the back of the wallet |


Fun wallet! Thanks for sharing at PDE Linky Party.
ReplyDelete~Owner/DT Janis
Wonderful creation & step by step instructions.
ReplyDeleteMelissa
"Sunshine HoneyBee"
Lovely wallet and practical. Thank you for sharing at QKR Stampede.
ReplyDeleteMary
This is fab!! Thanks for sharing with PDE, Jackie DT member.
ReplyDeleteWhat a fun project! Love it! Thanks for joining us this month for our challenge at Scor-Pal!
ReplyDeleteBeautiful inspiration using Scor-Pal!!! Thank you so much for participating in our 'More than one fold' challenge at Scor-Pal!
ReplyDelete