Showing posts with label Tutorial. Show all posts

Sunday, October 24, 2021

Fall Fox

 Howdy Crafters ~ I watched a Video By MARY ~ Cardz TV - to create this card.  I just love this Fox, which is my favorite print n cut image by Beccy.  I use Silhouette Studio and my Portrait to cut the Fox. All the Fall papers are by Recollections which I have had for several years.  

The sentiment stamp is by Cardz TV. I have used LF Rectangle Die, a banner die, and a 2 1/2 stitched circle die.Wood patterned cardstock. Foam tape is behind the Fox and the sentiment banner.   

You can follow Mary's video and see her card by clicking HERE.              

 Thanks for stopping by!

Sharing with these challenges

 
October Beccy's Challenge - using her Fox Image - which is my favorite Fox
 
October Four Seasons AG UE 10/25

Sunday, October 17, 2021

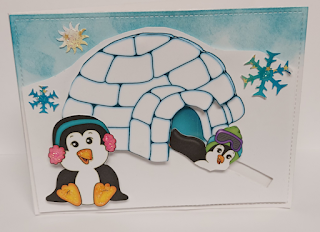
Interactive Penguin Slider


I created this Igloo Penguin Slider card watching a video by Kris Beach

CLICK HERE for TUTORIAL

Recipe
Vagabond2
Portrait Die Cutting Machine
Kris Beach Digital Precolored Set- Eskimo Friends
Pop Up Foam Tape
Fiskars Sun and Snowflake punches
Patterned cardstock for the Sun, and Snowflakes
Stitched Rectangle Die
Glitter gel - Pink and Orange
MFT Slider Die
Distress Ink for Sky

Sharing with:

  October CHN Patterned Paper UE

 
  #430 QKR Stampede AG 2/3

Imagine That - Customer Gallery - not a challenge

 It was an honor and privilege to follow along the tutorial created by Kris - I was so blessed to create a slider card - and her tutorial video is step by step so everyone should join in -- no slider die needed [even though I had one in my stash] so don't be shy - you can create a slider Igloo card as well - because - drum roll - Kris is providing a FREE [limited time] Igloo for your crafting pleasure! Hop on over!! Enjoy -- and I just love the video's on this posting Kris created - so talented and amazing!!!! Super Fun - enjoy your day!

Wednesday, October 6, 2021

Coffee Pull Card

 
 Recipe
Tutorial to make top part of gal move back & forth by:
Laura - MFT Design Team - Click HERE for tutorial
Vagabond2
Stitched Rectangle Dies
MFT Coffee Grande Gal
Markers and Ink
Score Tape

Inspired to create by:


Sunday, September 26, 2021

Jump for Joy

 Recipe
 
Tutorial to make top part of gal move back & forth by:
Laura - MFT Design Team - Click HERE for tutorial
 
Vagabond2
Stitched Rectangle Dies
MFT Jumping for Joy Stamp and Die
Markers and Ink
Score Tape

Inspired to create by:


#114
Crafting Happiness UE


September 2021 Patterned Paper UE 
 
Cut It Up Back to School ~ Follow a Tutorial


Friday, May 28, 2021

Coffee Interactive


Howdy Crafters ~ I create this card watching a video by Karolyn on You Tube - Meet me in the Middle Coffee Cup Creation.  I am also using the colors by MFT color challenge for this card. Thanks for stopping by.

Recipe
Vagabond2
Stitched Rectangle Die
Distress Grape Ink - Water Sprinkles - heat gun for background
Stitched Landscape Dies
MFT Cafe All Day die Set
Stitched Heart
Coffee Stamp - black ink
MFT Pull Stamp - black Ink
Foam Tape - Brads

Inspired to create by:

Saturday, April 24, 2021

Coffee Christmas Card


Recipe
Cardz TV Tutorial

Click for Tutorial:
Easy Fun Fold Tutorial by Mary G

Recollections Coffee Cardstock
Stitched Heart
Memory Box Rubber Stamp Sentiment - Black Ink

Sharing with:

Friday Cardz TV AG 2/3  

CHN Christmas Weekly UE

 April CHN Patterned Paper UE

Tuesday, February 23, 2021

Make a Splash!

 Recipe
Vagabond2
LF Stitched Rectangle Die
Spellbinders Circle Dies for the Rainbow
Get the Tutorial by Kris  Click HERE  Easy way to create a Rainbow
Glitter Gel For Rainbow - Red, Orange, Yellow
Fiskars Cloud Punch
Glitter Gel for Raindrops
Imagine That Digital: 1. Round Sentiment from the Dolphin Collection
2. Rainy Day Friends - I received Free for participating in her 8th Birthday Challenge - Thank you Kris - Rain Day Friends made as Print N Cut in Silhouette using Portrait to die cut - Foam Tape behind the Rabbit, Pig, Dog.

Inspired to create by:

Week 4 - Imagine That Birthday Challenge -Birthday Project with Bling - Glitter Gel for Raindrops and on Red, Orange, Yellow sections of Rainbow ~  Happy 8th Birthday Imagine That! ends Feb 28


 February CHN Patterned Challenge UE

W#479-480 Wed Word Art Wed AG

Sunday, October 6, 2019

Fall Deer

Howdy Crafters:

I learned a technique of using die cuts on paper napkin as the media from watching a video posted at the Memory Box Blog by Dave B.  

Actually, Dave used die cuts on white napkins and then colored the cuts with watercolors.

Leaf Print napkin-die cuts
I wanted to see how using die cuts on a printed paper napkin would work. I have some Leaf printed paper napkins so I gave it a try. Tada - the leaves came out great. [see photo]

Here is the link to Dave B Paper Napkin Die Cutting tutorial - Click HERE for tutorial.  Try it, you will be amazed at the results!

Recipe
Vagabond2
LF Stitched Leave dies +white cardstock
LW Stitched Rectangle dies - 2 sizes
Printed and Kraft Cardstock
Memory Box Buck Die - Distressed brown Ink
CUTplorations stitched tag die
Misti - Memory Box sentiment rubber stamp - Distress brown Ink
Metal Pumpkin Brad

Inspired to create for these challenges:

October#54  Outside the Box - Falling Leaves 

October CHN Patterned Paper
SS Happy World Card Making Day 
Upload your cards by 11:59 pm on Saturday, October 12th


Thursday, August 1, 2019

Summer Triple Flip

Howdy Crafters ~ My Karen B Triple flip die arrived today and here is my first card. 
Thanks for stopping by - 3 photos on this post.

Recipe
Karen Burniston Triple Flip Die Set
Vagabond2
Patterned, Black, Mint Green, White, Cardstock
Distress Inks, Markers,
Stamps - Cardz TV Sentiment
CUTplorations Life is Good Die
Karen Burniston Charm Dies: Flamingo, Beach Ball, Flip Flops, Tree, Fish
Scripture die inside card


Inspired to create by:
Karen Burniston Facebook Pop-Up Peeps
 Monday - Simon says Bright and Cheerful #4
Wednesday SS anything Goes#3
Wednesday Word Art Wed #3
Friday Cut It Up #179 Critters 1E 
August - CHN Patterned Paper UE
July - August - Cutplorations ~ AG with Die cut/Stamploration Product - Life is Good


Friday, July 19, 2019

Christmas Flip Flap Card

Recipe
Splitcoaststampers - Tutorial - CLICK HERE
to create the Flip Flaps Card Base
I created the door for this Christmas Card
Cardstock - Patterned, Red, Brown, White
Vagabond2
Tag Die
Rectangle Dies
Rubber Wood Mounted Plank Wood Stamp
Versafine Black Ink
Misti
HERO Arts [Sizzix] Rubber Stamp and Embossing Folder #657770  Christmas Package - Deer - Holly - Merry Word
Clear Christmas Stamp --Bakers twine --Markers 
Inspired to create by:
July Hero Arts - Christmas in July  1/5 
July CHN Patterned Paper UE
July CHN Christmas weekly
Wednesday Simon Says Make your own background 5/5
July - September STAMPLorations - Stamps+anything goes UE

Wednesday, January 2, 2019

Waterfall Card

 Howdy Crafters - After I watched this Video by Karen B - CLICK HERE - I was inspired to create this Christmas~Winter Waterfall Card. I did not have the die set she is using - however, I did use her Spinner Square die set for my panels and frames -  I created my own pull tab.

I never thought of using staples rather than brads to connect the waterfall portion to the card - that was a cool idea!

Thanks for stopping by! Have a Blessed week! ~ Gail ~
Recipe - 4 Photos for Waterfall Card
Black, White, Patterned, Kraft Cardstock
White Gel pen
Carta Bella, Echo Park and other Ephemera
KB Spinner Die - 2 squares
Snowflake Clear Stamp - Blue Ink
Stitched Landscape die for snow
3D Candy Cane Metallic Embellishment
Lawn Fawn Stitched Rectangle Dies
Cuttlebug
Kraft Cardstock

I would like to share with these challenges
Jan CHN Patterned Paper Challenge
Jan CHN Christmas Challenge

JAN WAW AG Week 1
Jan Joy Clair Winter Challenge UE
Jan Simon Says Wednesday Something New -New Technique #4
Jan Double D It's On The Menu #3


Wednesday, November 21, 2018

~November Mod Squad ~

Howdy Crafters ~ I am happy to announce I will be the Host for Mod Squad Challenge for this week.
The Sponsor of this Challenge is Shery Russ from STAMPlorations. I just adore Shery's products - so I was thrilled to Host the November Challenge at Mod Squad this week.

The Challenge for this Week:  Case Shery Russ.  I just love this technique by Shery Russ which is basically,  use a large sentiment stamp in the middle of the card page, then stamp around that sentiment.  Just think of all of the possibilities of stamps one can use around a large sentiment stamp. Love, love this idea!!

This is Shery Russ [owner of STAMPlorations] card creation
I first saw this card at STAMPlorations 5th Anniversary Celebration
Here is my card casing Shery's technique
 Recipe
For the Center Stamp: STAMPLorations  Chance to Change Typographia Motivation

For the stamping around the Chance to Change Stamp I used:
STAMPLorations Art Marks Stamp Set

Inks used: My Misti for Stamping
 Distress Orange & Blue & Versafine Black ink
White Cardstock - size A2 card

I am happy you stopped by. 
Now it is your turn to give this technique a try.
You may upload 3 new creations made for this challenge following the technique.

 Additional Information about our sponsor 
SPONSOR~ Shery Russ
Our stamps and designs tend to be artsy, sketchy — they primarily reflect the kind of stamps I love to work with — stamps I can combine to create a variety of designs. They are also sized primarily for A2 (and smaller) cards and ATCs and have a graphic/mixed media feel. (I’m a mixed media girl who has fallen in love with card-making.) We release new stamps almost every month. In June 2014, we started releasing one 5″ by 7″ stamp set every other month and offering this set to our premium stamp club subscribers.

I would like to share this card with:

November Just Keep on Creating Challenge

November WAW AG #1

Anything Goes Never Ending Challenge with Stamplorations Products

Monday, October 29, 2018

Decoupage Guest Towel Tutorial

Howdy Crafters ~ I have watched several tutorials this weekend on creating Decoupage Napkins for crafting.  One tutorial, use a glue stick, another use Mod Podge, and another was using sandwich plastic wrap with an ironing technique [which did not work for me].  

I first learned about Decoupage Napkins from Ellie-  A Bunk of Junk Design Team - in which I am a Design Team Member.

For me - the glue stick was the winner - but I added extra steps - using my DRY High Heat Iron.

I have Step by Step Photo's and written direction in this post if you wish to create some tags, pages, Journal covers, etc. for crafting using Decorative Paper Napkins. 

 I purchased Decorative napkins/Guest Towels at the Dollar Tree & Party Dollar Stores[ $1 - $1.50 for 12 or more in package].

This is my finished Decoupage Paper Guest Towel Tag
Stamping: TH Bee, Verve Sentiment
Misti - Versafine Black Ink
Sharing with:
October Simon Says Monday Take Flight #2
______________________________________________________
Here is my Paper Guest Towel/Napkin Tutorial
Supplies:
1.High Setting Dry Iron [make sure you have NO water in your iron]
2.Parchment Paper - 2 pieces
3. Elmer's Disappearing Purple Glue Stick
[I highly recommend using the purple-color glue stick to help you visually see the application of the glue]
4. Decorative Paper Napkin/Guest Towel - top layer only [you have to separate the top decorative layer from any other added layers - this Guest Towel had 3 layers - I purchased from Dollar Party 16 in package]

5. Cardstock - I used 110 lb I purchased from Sam's Club for this tag, but colors work great if they will show through - with this Guest Towel colors show through. I used blue, and pink so far.
6. Stamp[s] - Optional

7. Tag Die - Optional [you can fussy cut] - make large decoupage and use for journal covers, pages, card fronts.

8. Craft Scissors
This is the Decorative Guest Towel I am using - taken out of the package - 
then I separated the top layer from the other 2 layers
Here is the top layer of the Guest Towel separated & trimmed to the size I wanted
I decided to Iron my Paper Guest Towel first since it was wrinkled
 I have it laying on a piece of Parchment paper on my ironing board
Place another piece of parchment paper on top of the Guest Towel - now I have a sandwich - 
Parchment Paper - The Guest Towel - Parchment Paper
Using a High Setting DRY Iron - iron the sandwich to get wrinkles out of paper napkin
Note: I laid my Trimmed Guest Towel in the lower right corner of white cardstock first [no photo] and used a pencil to trace around it so I could see what area I needed to put my glue. 
This PHOTO above:  Showing how I covered the area with my glue stick -
 get the edges and also the inside area
I started from the bottom of the cardstock - to lay my Guest Towel over the glued area and gently smoothed it - being careful not to tear the Guest Towel - it worked well - no tears.
Do you see I have some portion of the Guest Towel at the top that I did not glue down? 
That is Okay to do that - and a bit of the Guest Towel hangs over the bottom edge as well. 
No rhyme nor reason for this - I just did it that way! he he
Off to the ironing board with this Guest Towel glued to the cardstock
I laid the cardstock on top of the Parchment Paper on my ironing board
Lay the next layer of parchment paper on top of the glued Guest Towel
So there are 3 layers - Parchment Paper, Cardstock with the glue Guest Towel, Parchment Paper
Same Sandwich that was used for ironing the paper Guest Towel before the gluing step.
Use a High Heat DRY Iron to iron your glued Guest Towel - it only takes a few seconds -
 I probably ironed over it 3 - 6 times
This Photo shows that I Fussy Cut around the Ironed Glued Guest Towel
It is now ready to use as a Journal Page, or Journal Insert - or cut some Tags!! 
See my next Photo for the tag prep I did before cutting
I laid the Decoupage completed Guest Towel on my Cuttlebug Plates
 and then positioned my Tag Die in the area I wanted the design to show
I then Trimmed the Napkin before running it through the Cuttlebug
Here it is: The Finished STITCHED Decoupage Tag die cut
Below is the tag I am entering in challenges. I used  Blue Cardstock as the background
Doesn't it look fabulous with a blue background as well?
I stamped on this one after die cutting - it works wonderfully!
Loving this decoupage technique!
More Photos:
Here are 2 Pumpkins I fussy cut from cardstock after using Heat and Bond scraps
to seal the Napkin first- this could be costly -
 I only had a couple scraps of Heat and Bond... these pumpkins turned out fabulous
More Decoupage I did and more to come:
I put tags in my Junk Journals, so these will be added
Love, Love doing this - Fun, Quick and EASY! We like EASY, YES??

Thanks for stopping by - have a blessed day 
[some day I hope to learn how to do video and place them on You Tube - it is on my Bucket List]